Friday, July 31, 2015

Classic Rounded Back Cloth Binding

Front cover of my classic rounded back cloth binding

Back cover of my classic rounded back cloth binding. I think picking the cloth and the paper was one of the most pleasureful parts of taking workshops at the San Francisco Center for the Book. 

The final workshop of the San Francisco Center for the Book's Bookbinding Core Certificate Program on April 25 and 26, 2015 brought all we had learned in the previous 3 weeks together in one skilled package. We learned some new things that built upon our existing knowledge and further refined skills we had already learned. Ultimately we created a beautiful cloth covered rounded back hard case book.

This workshop began with creating our signatures, as all the workshops did, but this time we folded larger sheets of paper into quartos, including two greenish colored end sheets, all of whose folded edges we cut in the guillotine after sewing the textblock.

Headbands were one of the main things we perfected this week. We started out on headbands last week with limp paper binding, we practiced more on old paperbacks this week on Saturday afternoon, and finally we used silk thread to sew endbands on our rounded back hard case book first thing Sunday morning. I loved sewing the headband, learning to make the beads, how to tighten each stitch, and appreciated the beauty and durability that emerges as a braid comes into physicality. Since I used two different colors of thread for this headband -- the white thread ended up being the "dominant" thread -- it was much easier to complete the sewing steps this week than last week.

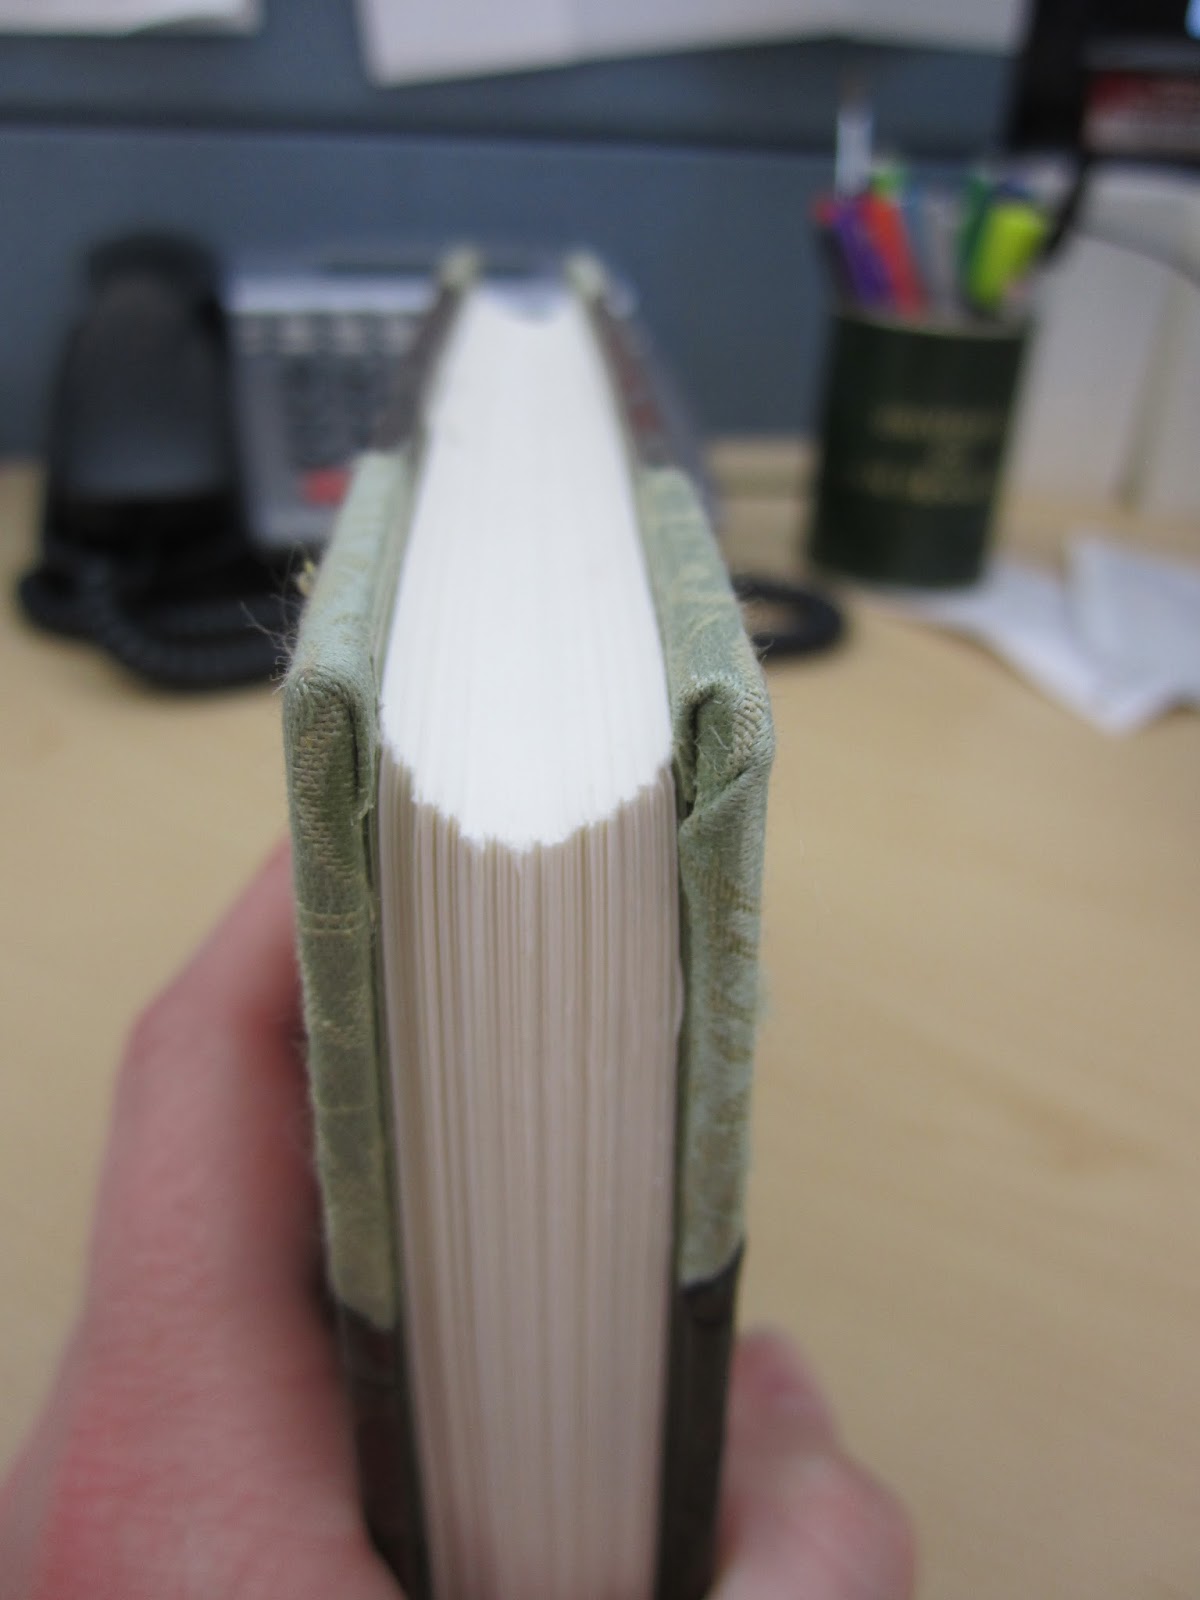
The best of my two end bands. Always can pack more and bead tighter...

The spine got a lot of attention this week. Expectedly, all our rounding steps were an aspect to be learned in conjunction with learning about the swell, but we also did a lot of finishing to the spine in preparation for the cloth binding, effectively preventing it from exhibiting raised bands. For rounding the spine, the trick is to push and guide the rounding with a hammer, not pound it, and never hit it straight on. For preparing the spine to be covered, we adhered several layers of different weight papers in between the cords and on top of the cords using wheat paste and/or PVA, sanded it down, and finally constructed a tube to adhere to the spine to achieve the hollow back state, providing movement and space from the cloth cover of the spine. The result was a book with a smooth spine, allowing the book to open and close with increased mobility and resilience.

Of most important note is the way in which the boards are attached. Unlike the flat back hard case binding that is cased in, the ends of the cords around which the textblock is sewn are laced into two separate boards that compose the front and back of the book, utilizing the lacing-in technique. The case is not a pre-existing shell that is attached to the textblock more or less by the endsheets alone like most contemporary library bindings. Binding a book by lacing the cords through the boards gave me a deeper sense of what makes a book durable, what gives it strength, and on the other hand, how it is used that can most commonly cause deterioration.

Click to enlarge if necessary --
if you look just to the right of the gutter, in about the middle, you will see the outline of two fan looking things under the surface of the endsheet. These are the cords with which I laced-in the boards. They are threaded through a grooved hole on the exterior side and emerge in the interior, where they are spread apart (to make the fan appearance) and pasted down. 

There are a lot of things I like about this book, but one of my favorites -- and the virtue of the form -- is the way in which the case fits around the textblock's joints or "grooves." We devoted much attention to the creation of the joints while the textblock was in the lying press, getting its rounding, and it was worth it once I laced in the cords and slid either board up to the joint. Could the joint be the sexiest part of a book? Maybe the most private one...

Detail of cloth and paper for covers.
The back is rounded on the spine which leads to this concave form of the fore-edge of the textblock. 

I don't see this workshop as teaching one particular form or style of binding, so to focus on the historical aspects of what we learned necessitates breaking it down to two categories: rounding and backing and lacing in the book boards.

Rounding as a physical characteristic began as a shape that occurred naturally due to the swell from the sewing threads and the pressure from the boards being laced in tightly; at some point since the year 1500, it became a technique assumed purposefully as craft (Middleton, 1963, p. 59). Rounding extends the life and durability of the book by taking pressure off the hinges (pressure that could result in a flat spine falling, which gives the fore edge a convex form), accommodating the swell of the sewing threads, and creating a shoulder or joint into which the bookboard fits perfectly (Roberts and Etherington, 1982, p. 222). As Middleton says, "fortuitous jointing" perhaps occurred before rounding was assumed as craft technique -- fortuitous because of the boon to longevity and heartiness it provides (1963, pp. 59). While the vogues of rounding styles came and went with the centuries and decades and may have been at odds with the ideal form of 1/6 of a circle, a book's inherent thickness may determine its rounding more than the binder's hand: "thick books of many signatures with extensive guarding will tend to round themselves more than is desirable with no help; and thin books of few signatures often do not have sufficient swell to permit any rounding" (Young, 1995, p. 99-100). Ultimately, form and function work hand in hand with the rounding of a spine.


Vogues of rounded backs (Middleton, 1963, p. 60).

Vogues of rounded backs (Middleton, 1963, p. 61).

The practice of lacing-in, in general, is one that has been around nearly as long as the practice of codex bookbinding, and for good reason, as it provides strength that adhesives alone cannot deliver. Roberts and Etherington trace the lacing-in technique from Coptic style bindings of the 7th or 8th century, through the vogues of how the holes were drilled through the wood and later paper boards throughout the centuries, to its decline in the 19th century in favor of split boards and the French joint (1982, pp. 148-149). Middleton goes on to discuss the method of carving a groove in the boards to allow for the cords to pass through, which began to be practiced at the end of the 18th century: "this is a very useful device because the weakening effect on the board is negligible, but it allows thick cords to be laced in without unsightliness" (1963, p. 74). This is what I learned in the workshop, and it provides an aesthetic effect needed for the fine bindings it is often associated with, in addition to maintaining the integrity of form for which it is used.


Works Cited

Middleton, B. C. (1963). A history of english craft bookbinding technique. New York, NY: Hafner.

Roberts, M., & Etherington, D. (1982). Bookbinding and the conservation of books : a dictionary of descriptive terminology. Washington, D.C.: Library of Congress.

Young, L. (1995). Bookbinding & conservation by hand: a working guide. New Castle, Delaware: Oak Knoll Press.

Wednesday, July 29, 2015

Reference Discards DS102.8 E54 v. 1 - 16 through CT120 T893

It must be that time of year or time of day because I am just moving through these as fast as possible, waxing philosophic as less as possible. Maybe there are publications ripe for commentary and reflection on this full cart (Who's Who of American Women; Twentieth Century Culture; An American Biography -- is this the old guard telling us in dry terms who and what is notable, what people "did" in the last century, and if so, why should we trust them?) but my MO is getting them over to cataloging to be done with them.


Friday, July 24, 2015

Limp Paper Binding

The third type of bookbinding I learned at the San Francisco Center for the Book's Bookbinding Core Certificate Program was limp paper binding. This was the most difficult to learn because it used unfamiliar methods, and we had a bit of a hole punch shortage. Our big breakthroughs this week were learning how to sew endbands and how to use a sewing frame.

Like in the previous two weeks, we prepared the text block by folding the signatures (4 pages folded in half to make 8 page signatures) and using the awl to punch the sewing stations. We also prepared endsheets of a light blue color by gluing the edge of a thicker fabric-like paper to the outside bend of the folded endsheet. We sewed the textblock together using the sewing frame, so before we could begin sewing, we had to set up the sewing frame with the pig-skin thongs to sew around on the spine. This was easier that setting up other sewing cords because the pig skin thongs were fairly rigid so we did not have to use the keys. I like positioning my body around the sewing frame and using both hands strategically as if I were embracing my sewing tools in a close hug. It made the binding process feel more intimate.

Next, we used another two thinner, longer pig skin thongs to sew the endbands around, and their length was to be used to lace the text block into the cover once it was ready. Sewing the headband and tailband was tricky and I can't say I am particularly proud of the end result. It was hard to determine when to dive down into the gutter of the signatures (how many beads to put in between each diving down, how to space out the diving down so it is aesthetically pleasing and sturdy at the same time). As with most endbands, the first one ends up being your tailband and the second one your headband because the second one is always better :) They are hearty enough to hold the binding together well anyway.

At this point I had a nice text block with two pig skin thongs flapping out of the middle of its spine and 1 each at its head and tail. It was waiting for its cover, but its cover wasn't a case that would be glued on to the endsheets. Its pig skin thongs were going to be tightly threaded through its cover.

Since vellum or parchment would have been prohibitively expensive for the workshop, we used handmade cave paper that was very sensually pleasing in its texture, weight, and sturdiness. I chose an apple red color while everyone else chose a shaded brown color (I figured the red went well with the blue endsheets and white thongs -- very patriotic).

The steps involved in making the cover included cutting it to size, folding flaps along the top and bottom edges to slip the endsheets into, cutting out room for the spine and endbands, cutting slits and tabs to connect the fore edge flaps to the tail and end flaps, and finally punching the appropriate holes through the appropriate sides (the flaps or the covers) for the thongs. I punched the wrong hole -- punched a hole clear through the cover where there shouldn't have been one! -- and really nearly gave up (I may have cried a little bit). Thankfully my awesome instructor, Rhiannon Alpers, pointed out that I could make it look like I did it on purpose and add another hole punch on the top and thread the thongs through once more. She taught me an important lesson about improvising in the face of a screw up and owning what design possibilities it may have precipitated.

Eventually I threaded the thongs through my folded up cave paper cover and it was like a rich man's textbook cover. Way better than any book covers I could have made from paper grocery bags in 8th grade, although I made some cool ones of those in my day.

Front cover of my limp paper binding

Detail of the headband -- notice the extra weave of the thong -- that's my mistake there.

Inside cover, in where I did an accurate and good job of punching and threading

Detail of the gutter between the text block and the endsheet

More detail of my mistake, as well as where my errant punch made its way through some of the endsheet and textblock.
The headband looks good though!
The back cover of the book, where the extra weavings of the thongs are apparent. 

Jane Greenfield, writing in ABC of bookbinding, defines limp binding as, "A binding with flexible sides of paper, parchment or fabric without boards. Also called flexible binding" (1998, p. 42) while Pamela Barrios points out one common aspect of the form: the rise of the small octavo book, like prayer books and textbooks that fit comfortably in the dexterity of your hands for long periods (2006, p. 24). Holding my little red limp paper binding felt good; not only was its size comfortable, but its agility and flexibility thanks to the lack of boards welcomed a close communion like a journal or an important notebook would.

My physical impressions of my modest binding are in step with the form's genesis, as Bernard C. Middleton, writing in A History of English craft bookbinding technique, pinpoints the first use and date of the form: "The earliest limp vellum bindings are found on account books and the like, at least as early as the fourteenth century, and in all probability were in use considerably earlier... most account books were quite thin, and could be carried around more easily with limp covers" (1963, p. 139-140). Middleton goes on to discuss the application of the form within the printed book, saying, "during the sixteenth and seventeenth centuries the limp-vellum style was used almost exclusively for the covering of books being sold retail, and as an alternative to leather bindings" (p. 141).

Like most of the evolution of prevalent styles of book bindings, the rise of limp binding is connected to the rise of printed material and the need to economize bindings. Nicholas Pickwoad says, "binders in the 16th century, faced by ever growing quantities of books from the printing presses, took this familiar structure and turned it into something much cheaper -- a possibility inherent in the limp binding structure, where there are many fewer steps required to complete the binding after sewing the textleaves than with books bound in boards" (1994, p. 72). Pickwoad also traces the form out of Italy, where it was popular by the beginning of the 16th century and from where "its use spread across Europe rapidly from that time" (p. 72).

By the 18th century the form had diminished in popularity, but John Carter, writing in ABC for book collectors, says, "limp vellum... was revived by private presses at the end of the 19th [century]" (1980, p. 134). Currently, the form is used by bookbinders, book artists, and conservators, and several recent articles describe the steps in depth. One is Jen Lindsay's "A limp vellum binding sewn on alum-tawed thongs," in where she says, "It is impossible to convey in words the essence of vellum as a material or the sensation of handling a well made limp vellum binding. It is a type of binding that reveals and tests, perhaps more than most, the innate sensibility of the binder and his inherent understanding, respect and affinity for natural materials" (1991, n. p.). So we have this comfortable little package that was both innovated as a way to increase economy and tests the skills of the book binder perhaps more than other forms. It's nearly a paradox: it takes serious skills to save money!

In addition to Lindsay's article, Pamela Barrios's guide to the form and its variations in the Spring, 2006 issue of The Bonefolder presents a useful discussion of construction styles, diagrams, pictures, and common deterioration of limp vellum binding.  


Works Cited

Barrios, P. (2006). Notes on the limp vellum binding. The Bonefolder: an e-journal for the bookbinder and book artist, 2(2), 24-27.

Carter, J. (1980). ABC for book collectors. London, U.K.; New York, NY: Granada.

Greenfield, J. (1998). ABC of bookbinding: a unique glossary with over 700 illustrations for collectors & librarians. New Castle, Delaware: Oak Knoll Press; New York, NY: Lyons Press.

Lindsay, J. (1991). A limp vellum binding sewn on alum-tawed thongs. The New Bookbinder, 11.

Middleton, B. C. (1963). A history of english craft bookbinding technique. New York, NY: Hafner.

Pickwoad, N. (1994). Onward and downward: How binders coped with the printing press before 1800. In R. Myers & M. Harris (Eds.), A millennium of the book: Production, design, & illustration in manuscript & print, 900-1900. Winchester, U.K.: St. Paul's Bibliographies; New Castle, Delaware: Oak Knoll Press.

Thursday, July 23, 2015

Discards mostly in the Es and the Ds

This week most of the discards are our outdated ethnic reference books, as well as a few series of the Who's Who variety.


I don't have much to say except I want to chill on the binding of this older volume of Who Was Who, which I think is experiencing some brittle books syndrome. Just turning the pages for these shots caused quite a few rips and tears.


Wednesday, July 22, 2015

Reference Discards HD 2721 I57 vol. 1 - 138 - E 185.96 W52 1998/99

I began this post on July 1 but was not able to finish and post it until today.

I readied the equivalent of three weeks worth of discards today because I am going to be on vacation for two weeks starting tomorrow at 5:01 pm :) The carts started off quite boring, with all 138 volumes of the International Directory of Company Histories. I apparently made the day of the Head of Cataloging and Metadata by bringing these to her! I was reticent at first, but then I discovered the series is covered in our subscription to Gale Virtual Reference Library (GVRL), and judging from the dust on the books, no one is using this behemoth print series.


Bye bye, International Directory of Company Histories!

As I moved into the Gs (atlases!) and Fs (San Francisco history!) I had quite a good time looking over the discards. The Dictionary of Imaginary Places is fun because it shows just how whimsical the Gs can get. I was particularly enthralled with the Sir Arthur Conan Doyle quote at the beginning. Not only does the quote seem to capture the nature of the book it introduces, it seems to capture a little bit of a reference librarian's guiding light.


The Karain Continent yes, but also a pink flag with some bad UV fading!


The Penguin Dictionary of Geography is fun as well, and I think would be rich with terms that could serve as writing prompts. I know that all these are outdated and that is part of why we are discarding them, but they are like time capsules to me and I lingered over them.


These little World Bank pocket atlases combine all the oppression of the World Bank's economics with a tidy atlas package! Political views aside, I do admire the economy of their physical being... little books are just so cute.


And in this post's installment of historic reference books whose entire existence seems outdated is this gem, Direct-Line Distances: United States Edition. So that's how we quantify as the crow flies.... got it.


Here's some other views of the carts' sides.


Last but certainly not lease, I encountered this pobrecita who never even got the chance to get mended... I would have like to given it a new hinge. No matter how sad, it's sort of cool to see the insides of a book's binding, to see how its spine was covered, how its text block was attached to its case, what kind of paper was used... 


Friday, July 17, 2015

ALA ~ Preservation Products and Services

At the ALA Annual Conference in San Francisco, I talked to several vendors on the exhibit floor that were offering preservation products and services. Here I will discuss four: T&D data loggers, Brodart, Azuradisc, and Digital Revolution. I was very impressed by the wide presence of vendors offering preservation products and services at ALA.

T&D

Promo Materials from T&D 

I saw an ad for T&D data loggers in the ALA Program and Exhibit Directory, so I made it a point to stop by the last day the exhibit hall was open. If there was ever such a thing as a library worker Christmas list, I would have a data logger on it -- temperature and RH are not routinely measured for the general and reference print collections at my library, so it would be interesting (just for fun) to see how much these conditions fluctuate for both. Furthermore, I will be conducting a survey about study zones in the fall at my library, so I was interested to see if data loggers exist to measure sound (decibels).

I found out T&D data loggers measure very important conditions for libraries, museums, and archives (temperature, RH, luminescence/UV, CO2), as well as conditions germane to other industries (instrumentation signals, location information for transport, pulse signals, voltage). Additionally, T&D's advanced systems can communicate data wirelessly, making collecting and charting the data directly automated to a PC. The wireless or wired data loggers can also trigger alarms, emails, and other notifications in the event a pre-set threshold is surpassed.

Unfortunately T&D do not offer data loggers for decibels, but I had a good chat with the representative about possible avenues to follow to that end.

Brodart

Brodart Guide to Book Care and Collection obtained from their booth at ALA 

Brodart is a company ubiquitous to the library community in all the library-related products they sell, including furniture, book carts, and signage. Brodart also offers book repair materials as well as a range of archival products such as boxes, files, shelving, sleeves, etc.

I picked up the Brodart Guide to Book Care and Repair at their booth, and the representative scanned my conference tag to send me a archival products catalog at a later date.

The Brodart Guide to Book Care and Repair is like a similar guide I got from Demco, which I used extensively for a Reference Collection survey and mending project I completed some years ago at my library. Looking over the Brodart guide, I surmise the techniques outlined are geared for general circulating collections primarily at public libraries, and are aimed at prolonging the circulation of the materials rather than preserving them in an archival sense. These types of guides are big on using tape and other quick, cheap methods of reinforcement and repair, and they do not always jibe with my training in archival preservation and book arts. Besides using binding tape when repairing spines of circulating books, I always defer to PVA glue rather than tape, and defer to a nipping press rather than a four sided rubber band for pressing.

However, the Brodart guide does do a good job of covering the basics of repairing hinges and spines that uphold the tenets of library bindings, as well as covering the terminology of book parts and other book repair and care terms. It's definitely a good starting place for novices and those on a tight budget.

Azuradisc

Azuradisc coupon for free disc repair and catalog obtained from their booth at ALA 

Azuradisc is one of several vendors that offer disc repair services that are valuable for the preservation of audio CDs, DVDs, BlueRay discs, and CD-Roms. The Azuradisc representative demonstrated the repair machine by scratching up a CD, putting a solution on it, then placing it in the machine which buffs out the scratches and makes the surface appear to be smooth as brand new. I see this as being very valuable to many types of institutions -- circulating disc collections in public and academic libraries as well as archives and special collections that are processing or preserving CD collections. A disc may be scratched upon ingestion, but with the repair like this, it will be able to be played successfully in the future, as well as reformatted without quality loss.

Azuradisc also offer other disc solutions, such as scratch guards for the foil layer (beneath the label), jewel case liners, microfiber optical cloths, spray cleaning, optical combo kits, and dual strip security labels. Lastly, they offer a mail-in service as well, in the event it is more cost effective to go that route rather than purchasing a disc cleaning machine.

Azuradisc makes their machines in the USA, in Arizona, which is great because I value that. While I did not speak to reps from other disc repair companies, I am not sure they can say their machines are made in USA as well.

Digital Revolution Media Preservation Services 

Digital Revolution promo packet obtained from their booth at ALA. It contains the article "Jean Sequencing" from the Society of California Archivists Newsletter, a handout called "Your history is important: Your media library is deteriorating • rescue it before it's too late," a handout called "Triage and your tape collection: Assessing magnetic tapes," an overview and workflow of Digital Revolution's media preservation services, and a reprint of a SF Chronicle article about Digital Revolution's project digitizing City Arts & Lectures recordings for the Bancroft Library at UC Berkeley.

I happened across the Digital Revolution booth on Friday evening (June 26), which was great synchronicity with Association of Moving Image Archivists (AMIA) workshop I had just attended and the Photographic Preservation class I am taking during this summer term. Digital Revolution is a San Francisco company that offers preservation and archiving services across the board -- from digitizing magnetic tape formats, to assisting in project management of archiving and digitization initiatives, to photographing and creating metadata for unique collections such as ephemera and clothing. It was really fun and exciting to talk to these reps!

I mentioned the AMIA workshop I had attended, and specifically discussed the portion of the workshop that dealt with managing outsourcing projects. The rep agreed that the things we had learned in the workshop are helpful, such as documenting the format, length, and number of video tapes in the digitization project, as well as specifying other aspects of the deliverables, such as file naming conventions and the way digital files will be transmitted back to the institution. Digital Revolution's guide to triaging magnetic tape collections that I obtained from their booth offered information in line with that I had learned in the workshop, such as the most at risk formats, how they deteriorate, optimal storage conditions, the pressing need to digitize these collections, and the difficulty obtaining and maintaining native playback equipment. I mentioned BVAC to the rep, as a BVAC employee had presented at the AMIA workshops. The Digital Revolution rep was very honest in his opinions of BVAC, and it was funny and interesting to see a different perspective of BVAC, and get a bit of dirt on the competitive nature of the local SF digitization companies.

Digital Revolution counts many California and Bay area organizations and companies as their clients: UC Berkeley, AAA, Chevron, NASA, Charles Schwab, The North Face, Del Monte, Disney Films, Wired Magazine, Chapman University, Gap, and City Arts & Lectures. Most interestingly, Digital Revolution worked with the Levi Strauss & Co. historian and archivists on a major project of creating a digital asset management system (DAM), the digital assets themselves, and the accompanying metadata. The digital archive contained thousands of images of the company's garments from the past 140 years, original wet plate collodion negatives (many of which had cracked), and physical artifacts like point-of-purchase displays, catalogs, historic books, and manuscripts. The Digital Revolution Rep said that working with the Levi Strauss & Co. archivist was very cool, because with each garment, she started telling stories about the clothing, its provenance, its history, and personal stories as well. I asked him if they also captured that as an oral history, and he said they did the best they could to translate her stories into useful metadata, but they did not record her talking. The Society of California Archivist's Newsletter ran a detailed article on the process in its Spring 2015 issue called "Jean Sequencing" that I recommend checking out.

Thursday, July 2, 2015

AMIA@ALA Moving Image Preservation Workshop

On Friday, June 26 I went to the AMIA@ALA workshop on moving image preservation. This was a great program with some of the coolest and most friendly people -- the presenters and organizers seemed impassioned and extremely knowledgable in the most approachable, universal way. According to the official overview, "The Association of Moving Image Archivists (AMIA) is proud to lead this workshop on preserving, protecting, and making audiovisual material accessible." The workshop was co-sponsored by the ALA Video Round Table.

AMIA@ALA Preconference: Preservation, Digitization, and More

How Libraries can Preserve Analog Resources in a Digital World


Presenters: Siobhan Hagan, University of Baltimore; Andy Uhrich, Indiana University; Maureen Tripp, Emerson College; Jennifer Jenkins, University of Arizona and Rick Prelinger, Prelinger Archives.

The opening presentation covered film formats and participants were able to examine 8 mm, 16 mm, and 32 mm film for identification of qualities such as soundtrack, perforation, size, etc., for the purposes of record creation and conducting a survey. The approach could range from collection level down to in-depth item level, and depends on available resources, intended use, and whether the work will be done in house or outsourced. One can identify objects through inspection of labels on the case and reel for descriptive metadata, as well as technical metadata such as gauge and sound from examining the film itself.

The presenters also spoke of preservation and conservation decisions that can be made from inspecting the can and film reel. Upon opening the can, immediately attempt to ascertain smell. A smell of vinegar, burning, or mothballs may be present if the film is deteriorating; if a vinegar smell is present, prioritize for cold storage and conservation treatment, if possible. It is also possible to use A-D strips in the cans to test for acidity level. Reels should be stored horizontally, and if the original can is not rusted and/or contains important labels and other unique marking, then it can be continued to be use for storage. Otherwise, it is advisable to obtain archival cases, one of which was given to each participant as a souvenir.

Other things to look for are color fade, mold, shrinkage (looks like cobblestone), scratches, splices, and broken sprockets. Nitrate prints should be immediately separated from other collections, and prints that are highly acidic or moldy should also be separated from other collections.

Lastly, the presenters left us with some resources:
• Library of Congress - National Film Preservation Board
• Film Forever
• National Film Preservation Foundation
• FilmCare.org (coming soon!)

Instrument to measure shrinkage and to ascertain if film is safe to be run through a projector.
This is only made by one man in Canada, and costs upwards of $1000.


Don't Be a Film Wrecker -- Best Practices for Storing, Repairing, and Viewing Film Prints and VHS Tapes


Presenters: Antonella Bonfanti, Association of Moving Image Archivists and Michael Angeletti, Stanford University.

This next section actually included some of the film information I mentioned above, but it was a bit out of order so I organized it better for my memory here. Largely this section dealt with magnetic video tape format, and was very exhaustive in identifying them. The presenter covered the most common formats, which were many as the technology evolved rapidly from the 1950s to the 1990s, and included professional grade formats as well as amateur formats.

The largest preservation issues the magnetic tape format faces is one that can coined as "degralescence" -- the combination of obsolescence and degradation. It is difficult to find native playback hardware, and the presenters stressed that time is of the essence -- for all these formats, buying playback decks is an essential activity, and a stockpile to canonabilize for parts is preferred if an institution has the space to accomodate it. The tapes themselves are subject to mold and sticky shed syndrome. Tapes experiencing severe sticky shed syndrome can damage playback decks, but can be baked in a tape incubator to abate the stickiness.

When processing and preserving a video collection, it is also important to create identification records, to mark the inventory on the tape, and decide circulation rules based on whether the item contains unique, valuable content, or if the content is replaceable. Tapes should be stored in quality snap cases (not cardboard), stored vertically, and never on the bottom shelf.

When viewing it is important to test the machine before inserting the video, and it is important to care well for the VCR: leave it empty, turn it off, keep it cool and dry, keep it clean, use it periodically, clean the transport, conduct electronic alignment and parts replacement maintenance at regular intervals, and when necessary seek professional tape treatment.

Tried and true image of the layers of magnetic tape. Such an illustration helps
one visualize types of deterioration based on structure.


A/V Outsourcing for All: A Step-by-Step Method for Initiating Video Digitization Projects 

Presenters: Elena Rossi-Snook, Association of Moving Image Archivists; Melitte Buchman and Kim Tarr, New York University; and Paula DeStefano and Jonah Volk, The New York Public Library. 

This session of the workshop was very technical and while the panelists identified best practices for managing digitization projects that are universal, some of the specifics of schematics and technical specifications went over my head. Nonetheless, some of the things I learned in the Project Management (PM) class I took at SJSU's iSchool in Fall 2014 reverberated in my head, as the presentation seemed to combine the tenets of project management with the specifics of digitizing video tapes. It seems that library and archive digitization projects are fertile ground to perfect PM strategies and approaches, and I wish that class had possessed a practicum aspect, where we could have mapped out our PM process in relation to a specific digitization project. 

But I digress. 

First off, digitizing video tapes is absolutely necessary in their long-term preservation due to "degralescence": both the native playback equipment is becoming scarce, and binder hydrolysis, aka sticky shed syndrome (SSS), basically affects all video tapes. 

The planning process begins with identifying potential vendors (through discussion with colleagues and friends, as well as recommendations from professional associations), sorting out copyright clearance, determining funding (it may be necessary to apply for grants), and developing a request for proposal (RFP). The RFP should be complete in identifying the materials that need to be digitized (types of formats in the collection, the time length, inventories), as well as stating the standards for the deliverables (specify the format of received digital files, naming conventions, timeline, etc.). Once you receive the deliverables from the vendor, there is still much work to be done, from conducting quality control and quality analysis, to ingestion, receiving original tapes back, and cataloging.

A representative from a local vendor, Bay Area Video Coalition, was on hand to discuss what happens on their end in the digitization process, which was probably the most technical aspect of the session, but also very informative. BAVC's Audiovisual Artifact Atlas was also mentioned, which is a "community-based, online resource used in the identification and diagnosis of artifacts and errors in analog to digital practice and archival work." It's a sensory throwback to even visit the site and watch the jumping and fuzzy VHS images. I can't imagine the inner sensory life of professional VHS digitizers. 

The presenters also referenced a lot of good resources and guides:

• Jonah Volk's presentation, To Outsource or Not to Outsource (pdf)
Digitizing Video for the Longterm (pdf), which came out of the Video at Risk program

Indeed, one of the presenters and his slide, a detailed schematic of the equipment
used for a proper digitization set-up.

Using Films: Reviving 16mm in the 21st Century Classroom

Presenters: Elena Rossi-Snook, New York Public Library, Pratt Institute/ Association of Moving Image Archivists; Roger Brown, University of California, Los Angeles; Josephine McRobbie, North Carolina State University and Jacob Barreras, University of Colorado.

This was more of a panel discussion than a training or presentation, and it was the perfect way to cap off the workshop as it blended pedagogy, ethics, medium, and message into a moving call to arms. The panelist had one message I heard loud and clear: bringing back the appreciation of superseded formats starts here, with you and your students in your institution. The panelists shared stories of moving students through interacting with Kodak Pageant projectors and 16 mm film that were surprising. The stories demonstrated the millennial generation's ability to go retrograde, to have a new world opened to analog media that redresses the fake promises of technology by which millennials so often feel bamboozled. 

The panelists highlighted film projection as a performance, the in-sync choreography of projectionist and projector, and the mesmerizing metronome of the projector's  click, click, click, click during a "performance" or viewing. One panelist mentioned the study of neurocinematics, which is a new(ish) field that studies the effects of films on the brain activity of its viewers. Apparently, the shutter gap in analog projectors gives the brain a half second to process the information it has received, which can simulate a near dream state in the viewer, and produce a very relaxing effect. That is in contrast to the digital projectors and digital format of film of the now, which often leaves viewers feeling exhausted no matter what type of movie they have watched. The panelists highly recommended the Pulitzer Prize-winning play The Flick by Annie Baker

This panel brought up the philosophic grounding of preservation, that preservation equals access, which can sometimes be at adds with the standard, conservative actions archivists and librarians take to protect collections. Some content is only available in the format of 16 mm film, and efforts to watch it and catalog it make saving it more essential. It is not simply a question of digitizing everything, it is a question of even knowing what we have before digitize anything. If we don't watch it now, by projector, it will be regarded with such obsolescence within 2 or 3 generations there will not even be a way to watch it, let alone the desire to watch it.

The venue was the Ninth Street Independent Film Center. In the last
session, participants were treated to watching a film on 16 mm,
projected from the Kodak Pageant projector pictured above.  

Theory Meets Real Life

In a funny dovetail of events, a couple days after the workshop, my mom started asking me about an 8 mm projector she thought my dad still had. I asked her why, why did she want this projector. Turns out she had been storing a box of home 8 mm films in her closet, and I got excited to put some of what I had learned into practice. First, I inspected the film and their storage cans, ascertaining that the tins were still in good condition, but that the film prints themselves were deteriorating a bit because the smell of vinegar was present. Otherwise there is no dust or mold on the film, so that is great. We now have a preservation plan for the film: package them in double thick freezer bags and store horizontally in our home freezer, as described in the The Film Preservation Guide put out by the NFPF. Next, we have to acquire an 8 mm projector as soon as possible (turns out my dad is not in possession of a projector), because as mentioned over and over in the workshop, now is the time to obtain the native playback equipment for these analog formats. In the next 5-15 years they will become so rare that what is available will be very expensive. I am excited to experience the visceral pleasure described in the 16 mm viewing panel, and I consider the act to be one of deliberate performance: sure, my mom and I will probably digitize the films eventually, but I look forward to experiencing them in their native format, and experiencing that hypnotizing click, click, click, click of the projector.